Tuesday, February 17, 2015

SPRING~tastic DIY Front Door Wreath!

 
Hello Lovelies!  Its been over 4 months since I have blogged OR crafted anything!! Ahhhh!!  That's what happens when you are preggo and sick for the past 5 months!  I'm SO happy to finally be feeling somewhat back to normal...So, I don't know about y'all, but these wintery days have been getting me in the mood for bright colors and SPRING! Not to mention, my drab front door needed something fun and uplifting.  Check out my SPRING~TASTIC Front Door Wreath below...
 

I gathered all my supplies from both AC Moore and Hobby Lobby, along with putting their awesome 40% off coupons to use!  Below, I used one of my favorite painting techniques...dipping a pencil eraser into paint and "stamping"...real fancy, I know. Hey, it creates a fun design, don't judge:)


Okay, so how awesome is this chevron burlap ribbon....ahhhhhhh, its my absolute fave design and it's on burlap.  What the heck is not to love about this combo?!?


Let's talk about flowers...There is something so lovely about a magnolia.  I am not a flower guru by any means, but I know what I love and I LOVE magnolias!

 
So, there it is...my Spring DIY Wreath!  So simple to make and very inexpensive, might I add. That's a bonus!  I think it makes my front door look a bit more cheery, and during this extra cold winter, I'm up for some extra pizzazz!  What kind of flowers would you choose for your wreath??  Maybe a combination of several different types? 
 
 
Thanks for stopping by!  I hope everyone is staying warm...now time to get your craft on!
 
Toodles!

Pin It

Monday, October 13, 2014

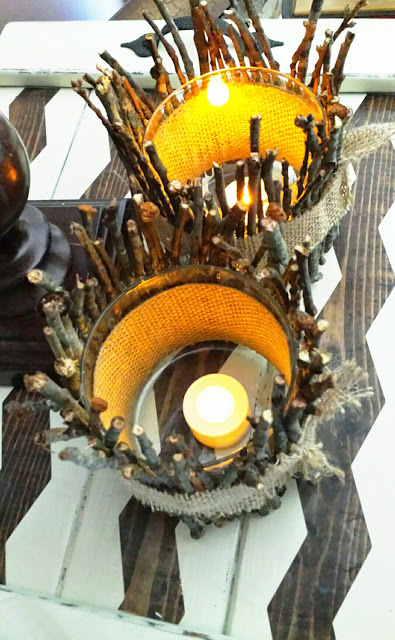
Rustic DIY Twig & Burlap Candles

Happy Fall, y'all!  The best season of ALL to create fun DIY projects for your home....well, at least it's MY fave!  I made these adorable rustic candle holders a few days ago and guess what...they cost me absolutely nothing because their 100% upcycled!! Woohoo!!!
Pin It
 
 
I absolutely LOVE Bath and Body Works Candles and when I am done with them, I stick the candle container in the freezer and I wait a few hours before taking them out.  After a few hours, I remove them and carefully remove the wax by poking g it with a knife until the wax pretty much cracks and crumbles. Then I clean it all out and I am left with and perfectly clean glass container....now for the EASY candle project.
 
 
I gathered up a bag of sticks from the yard and broke them down to the size I wanted.  Then I took a roll of burlap ribbon and cut it to the size of the jar and nd glued it on the outside which makes it easier for the sticks to stay glued, instead of gluing them straight to the outside of the glass. (I learned that the hard way, thanks to the hubs that gave me this idea;-) 


Once they were all glued,  I tied some scrap burlap around the outside and there ya have it!! Pop in some battery operated tealights and you now have some fabulous and rustic candles! I plan on using these for my Thanksgiving tablescape this year...it love them!


Aren't these so cute?? And since I already had the burlap and the glass containers, they cost absolutely nothing!  I love projects like this...so what are you making for your Thanksgiving tablescape this year?? These would go perfect with any fall decor, mantle, or whatever fall projects you have in mind. Thanks for stopping by! Toodles:)

Thursday, September 25, 2014

Preppy Faux Fall Pumpkins~DIY Harvest Decor!


Hello everyone! If you didnt see my guest post on the amazing BeBetsy Blog, here it is!!  I was so honored to have been approached by the two lovely gals that run BeBetsy so, thanks Sharon and Denise, you gals rock!  Today I am sharing my DIY Faux Pumpkins with you all...a little bit of "preppy", mixed with a splash of "glam" and topped with some fabulous burlap.  What's not to love? 


I don't know about anyone else, but I am just a little in love with the Fall season...okay, I'm OBSESSED!  It's my absolute favorite time of year.  Even though the weather has literally been humid and scorching here in Tennessee, I can't help but to start pulling out all of my Fall and Halloween décor.  As I was decorating with what I have, I realized I was in need of a cute decorated faux pumpkin. 
 
 I tell myself every year, while strolling through Hobby Lobby and admiring their stash of different colored and shaped faux pumpkins, "next year I am buying some of those!".  Finally, I stuck to my word and bought some.  To make it even better, they were 40% off!


Here is what I used to create these fun and preppy pumpkins:
  • Faux Pumpkin
  • Acrylic Craft Paint
  • A Sharpie Paint Pen {used for the smaller dots, but a tiny paint brush will work too}
  • A Round Spouncer Sponge used for the dots {found in the stencil section of your local craft store}
  • Burlap Ribbon {I purchased both patterns from Hobby Lobby}
  • A Sheet of Gold Glitter Paper...this stuff was really neat.  The back of the glitter sheet is canvas, so it's real easy to work with. {I found this in the same section you would find felt}
  • Hot Glue Gun/Glue Sticks {For attaching the glitter dots and creating/attaching your burlap bow}
  • Black Adhesive Vinyl and Transfer Tape used for the lettering
  • Cutting Machine~I used my Silhouette Portrait.  **If you don't have a cutting maching, no worries!  You can use stencils or even freehand your phrase/monogram**


I am so very pleased with how these came out!  This was my very first project, EVER, using vinyl.  I was scared, needless to say, because I thought I was going to completely mess these up.  Let's just say I was jumping up and down after I was finished.  Wouldn't these make cute gifts?  I actually gave the "Happy Harvest" pumpkin to my little sister, who calls herself "creatively challenged".  She loved it and I'm kinda jealous she gets to keep it!  

 
So, who are you going to make one for?  Oh, the design possibilities are endless!  I would love to make a chevron pumpkin, because who doesn't love a little {okay, A LOT} chevron. Thanks so much for letting me share Preppy Faux Fall Pumpkins with you all, I hope you try to create some fun & fab pumpkins of your own. Toodles and Happy Harvest!
 
Pin It

Wednesday, September 17, 2014

Three BOO-tiful Blogs and their DIY Crafty Treats!


Hello and Welcome to one of my absolute FAVORITE blog posts of all time.  Who is ready for TONS of Halloween DIY awesomeness??  I am excited to show you all I have in store today.  First, I want to thank Gladys over at The Mother Overload , for inviting me to be a part of this collaboration post.  I also want to thank Gisella, over at Serendipity Events NYC, for joining this collaboration with us as well!  Both of these gals have UHHH-MAZING blogs and they are both talented and incredible women and moms.  I am thankful to have met these women through blogging, MUAH!  You will find links to their posts at the bottom of this post...You know what they say, save the best for last! Trust me, you don't want to miss their creativeness!

This post is chock full of numerous fun and spooky Halloween projects, some of which are projects I've already posted last year...but hey, who doesn't love a good throwback, right??  The first and main project is this neat little open front Haunted House.  I made this several years ago, waaaay before even thinking about becoming a blogger, so technically, this is a new project for everyone else, right?

 
I purchased the plain unfinished wood house from Michael's Arts and Crafts Store.  First, I painted the entire house a dreary gray color, perfect for a haunted house.  Then, I picked out my spooky scrapbook paper and went to town on measuring and cutting, so it would fit around the windows on the outside.  To make the "shutters" I cut scrapbook paper to the size I needed, then folded them like an accordion.  To make them look old and dirty, I rubbed them onto a stamp pad with black ink.  You could also use black paint, but I was feeling extra "crafty" that day.
 
 
Now, the fun part.  I took 2 different colored greens and cute all different sized square pieces with my Fiskar design scissors {design scissors? shape scissors?? I don't really know what they are called...lol}Then, I dipped and rubbed them into my ink pad to give them that worn and dingy look. 


  For the inside of the house, I chose a black and white Damask wallpaper, aka "scrapbook paper".  I wanted to give it a more "haunted" effect by making the walls look dirty and old so I made random smudges with the same gray paint.  I did the same effect with black paint, on the outside of the house...gotta love that molded, mildew effect!


That was one of the most fun and satisfying projects I've ever done...it's amazing the impact that paper and paint can have! It was a SUPER thrifty project too, all I had to purchase was the wooden house! Even if you don't have the paper or paint on hand, those items are very inexpensive. ..I hope you get inspired and make yourself, or a friend, a creepy haunted house too:) 


How about these Mummy Tea Light Holders? Another CHEAP, practically free Halloween craft you can make! You can check out how to make your very own HERE. 


  Who loves DIY garland?? I DO, I DO!!  If you are obsessed with making a big impact for very little money, DIY garland is your kinda project! I made this with a small "fat quarter" pack of fabric from Walmart and some twine...this cost less than $5 to make!  It went perfect for my stepdaughter's DIY Halloween Birthday Bash we threw for her last year.  This was part of her photo booth...check out all the deets and more DIY party ideas HERE!


Anyone else here in love with CANDY CORN!?  If so, I have 2 perfect projects for you!  I made a set of Candy Corn Wine Bottles last year for my sister Brittany, but completely forgot to make myself a set. So, here is this year's version...I made myself and my stepmom a set, too.  I added the chevron burlap bows and now I adore them EVEN more than the ones I made for my sister...she's kind of jealous that I didn't make HERS with bows!  


Love this Candy Corn Door Hanger?  Get the details on how to make your own, as well as the tutorial for the Candy Corn Wine Bottles, HERE.  FYI, these projects are fun and easy to make...not to mention, they are cute and make a big impact!

As if you don't have enough Halloween DIY ideas, Gladys from The Mother Overload and Gisella from Serendipity Events NYC are sharing even MORE ideas!  

This is what Gladys is sharing...
 
                              Easy & inexpensive way to Boo-tify Your Entryway/ Foyer

"This year, I decided to stick with last year's black and white Halloween decór for our entryway. As most of you know, I'm far too obsessed to let go of this color palette. And although I incorporated a few items from last year's decor, I also added some fun inexpensive items to the mix. Most of the items you see in my entryway are either dollar store items, recycled or created through a free editing website. Yes - Brace yourselves all the artwork you see was done through an editing site which is free! See where and how you can re-create each piece (including the canvas!) by stopping by my blog". -- TheMotherOverload.com
 
 Here is a preview of her INCREDIBLE talent!! 


Now take a look at what Gisella has created...


What beautiful, yet SPOooOoOoky fireplace and mantle décor!  She creates amazing décor for all sorts of events...I have SUCH talented and creative friends! Check out all the details for Gisella's  decor, as well as all her other awesome DIY décor and events, over at Serendipity Events NYC!
 
Well, folks!  I hope you really enjoyed this post as much as I enjoyed writing it.  I just loved collaborating with these ladies, their talent is limitless and inspiring.  Thanks so much for stopping by...now tell me, which one of these DIY's {or will you be doing all} and crafts are you going to re-create??
 
Pin It

Monday, September 8, 2014

Instagram Blog Hop~The BEST Instagram Party, Every Monday!


Summer fun is in full effect here at The McCroskey House!  If you are a Tennessee local {In the Maryville, Knoxville or Farragut area} and have kiddos, I would absolutely recommend McFee Park!  It's one of the newer parks and the playground is phenomenal!
  Not to mention, the splash pad is next to the playground!  Even if you don't live in the area, check your town or nearby city for splash pads.  Its the new craze and its the perfect way for your kiddos, and you, to stay cool in these dreadfully hot days! 

Pumpkin Fun and The Tennessee Valley Fair!

Thanks for stopping over to check out my family fun~filled weekend! We stopped off at our local nursery to go "harvest" shopping, aka "Pumpkins and Mums!"  I couldn't help but snap some pics of all the beauty around us.  Such beautiful and bright colors, gets me in the mood for that cool, crisp fall air...can it hurry up and get here already?
Ohhhhh, how I LOVE pumpkin shopping. Don't get me wrong, it's BLAZING hot and humid right now, but that didn't stop the Hubby and I from picking up a few things.  It definitely didn't stop our lil' dude, Bryson Kyle, from running all over the flower nursery either.  Once he spotted the pumpkins, he made a pit stop...he found the perfect pumpkin and right after I snapped the picture, he threw it! Haha!

 Anyone else love MUMS??
 
 
My hubby did a fabulous job  decorating the outside!  We plan on cutting the 2 giant pumpkins in half and setting the mums inside. I'm so excited!
 
 Tennessee Valley Fair...have any of my local or non-local readers been?
 
 
Ahhh, the smell of corn dogs and funnel cakes in the air...reminds me of my childhood.  I can't believe it's me, taking MY child to the fair now.  Its absolutely mind boggling how fast time goes by!
 
 
You are now witnessing Bryson on his very first ride WITHOUT Mommy or Daddy!!  I was a nervous wreck.  Okay, okay...I know its not like he's on a 70 mph roller coaster but he was on a ride all by himself! His cousins Adelina and Arianna rode with him, too, but no mommy...my boy is growing up too fast!
 
 
The best "cousin" shot we have...its funny how challenging it can be, when taking shots of ONE child, let alone THREE. LOL!! One is more interested in the flower he just picked off the prop, and the other two are clearly interested in other things.  But hey, at least they still have a plastered smile on those cute lil' faces.
 
 
Bryson was completely enamored with the livestock! 


And he just loves his mama:)


That smile, though...melts this mama's heart! 

Monday, September 1, 2014

Instagram Blog Hop!


Happy Labor Day, Y'all!  I hope everyone is having a fun and safe holiday weekend!  I have been getting back on my "crafting horse" lately, which I am super happy with since I missed it dearly.  You know how life just sometimes gets in the way of those extra lil things you love to do...yep, it happened to me.  BUT, I have been working on some awesome projects. Here is a peek of my latest...